Showing posts with label Christmas. Show all posts

Friday, December 14, 2012

CAS-ual Fridays CFC82:Even The Score

Hey everyone...welcome back for another scrappy post. Today I'll be sharing a card I made for the current challenge over at CAS-ual Fridays. I'm on the DT for Scor-pal and they're sponsoring the challenge for this week so we were invited to create a card within their theme..Even The Score. I jumped at the chance to do this as I love this challenge blog and I use my Scor-pal all the time so it was a no brainer for me : )

First let me show you my card then I'll show you how I used my Scor-pal .......


To create the diamond pattern..I took a 6 x 6 piece of vellum and placed it on my Scor-pal on the diagonal and made a score mark every 1/2"


Rotate your vellum...place it on the diagonal and resume with the 1/2" score marks...

When your all done your vellum will look like this....


Next I used my Scor-pal to create the fold for my card...


Now that the basics for the card have been created..the fun & creativity begins : )


I added some tiny sparkle bling to accentuate the diamond pattern.


I used a left over strip of the scored vellum for the inside...just to tie it in to the front.

And one last look...


Thanks for stopping by and checking out my scored & sparkly holiday card : )

Be sure to head on over to the CAS-ual Fridays blog to see some inspiration from their DT and to see the FAB prizes being offered up by Scor-pal. You'll want to head into your creative space and start working on your card for this challenge.

Happy Craftin!!

Products used:
Scor-pal
Scor-tape
Vellum
Websters Pages-A Botanical Christmas
CTMH-Sparkle Bling
Tim Holtz Distress Ink-Iced Spruce
DCWV CS
Stickles-Holly, Copper, Christmas Red


Thursday, December 22, 2011

BINGO Holiday Tags

Happy Thursday Bloggers : )

Today I wanted to share some Bingo holiday tags I made for my co-workers for our annual department Christmas gift exchange which usually results in me gorging myself on some AHmazing sweets made by the wife of one co-worker & this year I didn't disappoint...lol.

It's not always easy finding gifts for a group of techy guys (I work in the Tech Dept. for our school district). Luckily I am not the lone female anymore...Alisha has joined us and I couldn't be happier : )

So I thought this year I would make them something they could hang on their tree and have for years to come (hmm...they better keep these forever...lol). They seemed to like them and I am sure their wives will enjoy them as well. 

So enough of the chitty chat, here they are......................

I personalized each one with their last name. The wooden bingo number has a meaning for each person as well. 

This one is for my boss Brian....


Next up is my girl Alisha...our Technical Support Specialist :)

Now Peter, our Lead Network Analyst......


Nathan's...another one of our Network Analyst's....


And lastly our intern from the local college...Gregg...


I really enjoyed creating these holiday tags for them & it was even better to see the smiles on their faces when they opened them....it also didn't hurt to have some chocolate truffles in there too ; )

Thanks for stopping by...I know it's a busy time for most with Christmas just a few short days away. 

Be sure to come back for another scrappy post : )

Thursday, December 15, 2011

Holiday Chipboard Panels

Hello there fellow scrappers...welcome back for another scrappy post : )

Today I wanted to share some of the holiday panels I've made with some chipboard. Normally I make these "name boards" for custom orders but I thought it would be fun to make some with a holiday theme this time around.

First up is Noel....

You will never guess what these panels are from. I work in the IT department for our school district and these chipboard panels are from the inserts they put in netbook and laptop user manuals. They normally wind up in the recycle bin but now they wind up in my scrapbook room...and yes I cleared it with my boss before I took them home : )

I really like how this sparkly paper that I originally purchased to use in my wedding album fits in so nicely with this holiday theme. It looks all snowy/wintery like. The chipboard letters were "naked" and I just put some adhesive on them, laid the paper on top and cut them out with my craft knife.

I ran some glittery ribbon through the boards to tie in with the sparkly paper. It's hard to see in this picture but the white portions on the letters are parts of reindeer and trees, they are fuzzy and feel great when you run your fingers over them. That's one of the many things I love about crafting...the textures of the projects when you hold them in your hands...love it!!
And here's the backside. I like to make the back look pretty too so you have something to look at if you have it on a desk or whatever. I have a name board I made for myself that sits on my counter so I have something nice to look at when I look up and not just stare at plain chipboard. My friend & co-worker Alisha bought this one from me...thanks Alisha : )

Next up is another Noel but with different paper & letters...
I used some of the paper I put on the letters from the first chipboard Noel and added some white glittery letters this time.
I really like this holiday paper pack from K & Company. Some of the papers have felt elements~like the patterned paper on this board~and some have bling and glittery sparkly accents...love it!
I used some cranberry yarn to tie this board book together...I liked how well it went with the papers and picked up the red accents in the patterned paper.
Tying some sheer sparkly ribbon on the ends of the panels just seemed to "tie" the look together...lol ok cheesy I know but hey...that's my sense of humor : )
And here's the backside.....cute huh???

Next up is Joy....

Since I chose this striped holiday paper I thought I would keep this one simple and just have the letters stand out so I only added some ribbon/trim to the letters with a little bit of bling on the bottom panel.
And here's the backside.....

And the last one for this post is Peace........
Normally I use different papers, patterns etc on these boards but I really liked this paper and wanted to just stick with it alone on this one.

Again I wanted to keep this one fairly simple since the paper has a pattern on it and I didn't want it to look too busy. I just tied some red thread to each letter to sort of make the letters pop out a bit. I inked the twine I used to join the panels together to give it a more vintage look. 

And here's the backside..........
The paper on the back is Bazzil...I forgot the name of the color though...so I just left it plain since it's textured. 

I've had a lot of fun scrappin up some holiday items in the last couple of weeks. It's just so fun to break out the Christmas papers and all the trims and embelishments that go along with the holidays and create something to not only look at & enjoy but to also decorate your home that you can use year after year. 

My next post will be about Christmas tags I've been making for some holiday orders so be sure to come back for another scrappy post : )

Monday, December 12, 2011

Made Especially For You...Let It Snow Weekly Challenge!!

Happy Monday fellow scrappers : )  Today marks another weekly challenge over at Made Especially For You.

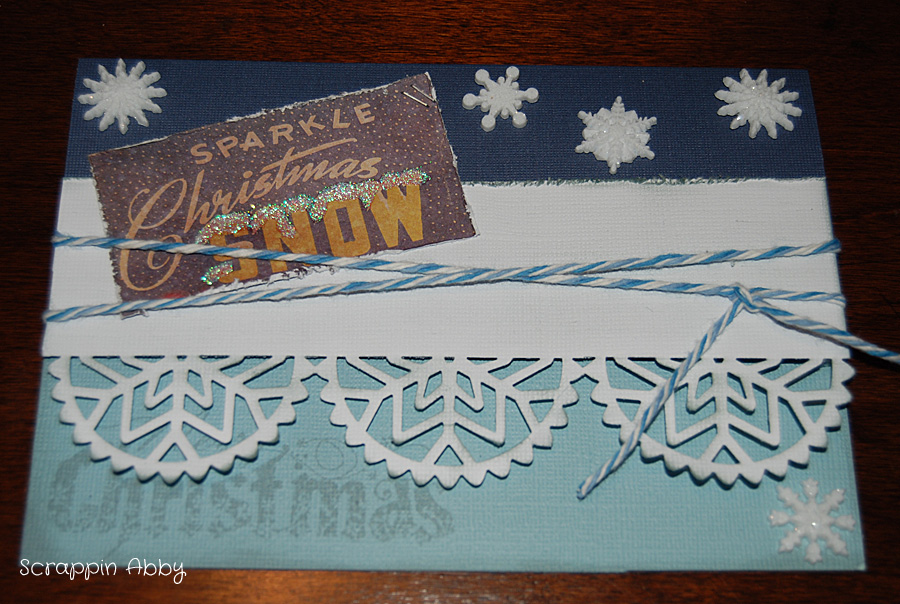
This weeks challenge is to Let It Snow Let It Snow Let It Snow by creating a card or scrapbook LO that features some form of snow or snowflakes. Here is my DT submission for this weeks challenge...

I have been in holiday tag mode for the past week so it was fun to switch and work on a card for a little bit. I decided to do a card instead of a LO since I can actually use this to send out this holiday season..two birds with one stone right?? : )
I cut this out of the Tim Holtz Idea-ology Season Paper stack. There was a Santa on the bottom half but I cut him off & will use him on another project. I added some clear stickles to the sentiment just to make it seem well more "snowy" looking. 
I used the Merry Christmas stamp from Inkadinkadoo with the Iced Spruce TH Distress Ink. That's also what I used to ink around the edges on the card. 
I created the snowflake border on the white Bazzil buy using one of the Martha Stewart snowflake border punches. I don't recall the exact name of this one as it came in a pack of 4 punches. The little glittery snowflakes are from my after Christmas clearance stash from last year. 

With the big family that both Steve & I have I know I won't have any trouble finding someone to give this card to for the holiday season : )

Be sure to head on over to Made Especially For You and check out all of the details surrounding this weeks challenge. You won't want to miss out on the awesome prize that K 'n K Designs ,our sponsor for this week is providing. You will get your choice of 3 digital stamps...how cool is that??? 

Sunday, December 11, 2011

Some Twiny Holiday Projects : )
Happy Sunday fellow scrappers : )  I have been up since the crack of dawn working in my craft room so I thought I would take a quick hot chocolate break~smothered with marshmallows of course~ and share some of the many holiday projects I have been working on. Today's focus is on twine. Now I have been using twine for a long time in my scrappy projects here and there and it's been fun using it in my holiday items. 

First up are a couple of tags I made this morning...

I really like how these turned out (if I do say so myself..lol) I bought these jingle bells last week, one pack in silver & the other in gold, and as I was falling asleep last night I was trying to figure out ways I wanted to use these. So instead of having "visions of sugarplums dancing in my head", I had jingle bells..lol. 

Here are some pics of the white tag....
And here are some pics of the blue tag....


Next up is a Noel banner I made from some smaller tags I cut from my Cricut using the George and Basic Shapes cartridge. 
These tags were a fun..quick & easy project to do. I had these lights from my after Christmas clearance haul last year. I thought they were cute on the tags...sort of dress them up a bit. 


Here's another tag using more of the blue/white twine. I seriously have made over 60 tags in the last week and half...all of which I have sold (yay) so I have more pics to share but didn't want to tag you all to death in one post :)


I have another project I want to share that also has twine on it but I can't just yet since it's one of my DT projects. I will be posting about that one tomorrow. 


I will have some really cool chipboard word panels to show you on Tuesday that are holiday themed so you won't want to miss that post. These are something I have been making for a few years but these just happen to be for the holiday season. I've been busy making all kinds of holiday things for my space at Not Too Shabby  , for co-workers/friends and for my personal use as well and I am extremely grateful for all of those who have been helping support my small business, ScrappinAbby Creative Designs. I really do appreciate each and every person who have been ordering from and me for those who have placed custom orders that I am working on right after the holidays are over. I absolutely love nothing more than playing with paper & having people encourage me and "hire" me to create scrappy items for them is just a bonus : )


Well...guess I better get back to scrappin. I hope you all have a fantastic rest of your day and be sure to come back tomorrow for another scrappy post : )