Hi Friends! Today I'll be sharing another fun project with you for Linnie Blooms June's Challenge: Outdoor Fun. This month we'll be showing you some fun ways to use your LB Stencils/Masks and Canvas pieces to show what kind of outdoor fun we will be having this month. I have a secret though...my outdoor fun isn't until July when we're on vacation so don't tell anyone ; )
I created a mixed media layout using some of the LB canvas pieces....
I also have a video that shows you the project up close along with a tutorial of how I created the leaves using some of the LB Canvas Pieces...
In the video...I walk you through the steps on how I created the leaves for this layout but below is a photo of the process so you can see the transformation...
Love how these turned out and how they added such a fun texture and pop of color to the layout....
I can't wait to put a family photo of us on the beach on this layout once we're back from our vacation next month. This is going to be a fun addition to add to my gallery wall at home and what a way to remember a fun day of my family enjoying some "Outdoor Fun".
Thanks for stopping by my blog today and be sure to head to the online store and pick up some of the Canvas Pieces for yourself.
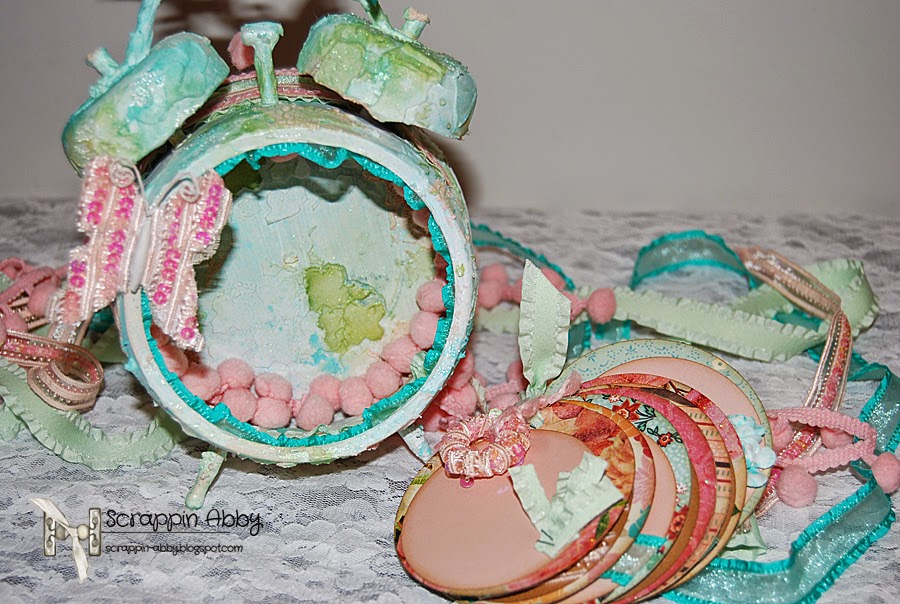
Hi Friends! Today's post is all about my projects I'm submitting for the May Arts 2014-15 Design Team call..Whoop Whoop!!! I have quite a few projects to share along with a tutorial so let's get started : )
My first project is an altered linen mini book which is also my tutorial for the DT Call. So be sure to watch for the additional projects below the tutorial and video.
I also have a tutorial video that shows you how I made several elements within this project using different May Arts Ribbons & Trims...
Since I go over in detail all of the ways I used the May Arts trim, I'm just going to show you a photo of how I used Item No.364-15-12 and turned the ribbon into some fish tail banners for the project...
I stamped an image on the ribbon, traced it with my Distress Marker and cut it out. I then used my distress tool and frayed the edges. Loved how this turned out and it looks great in the mini.
Wow..that's quite the list of projects...I appreciate you sticking with me through all of the photos : )
As you can tell I LOVE to use ribbon in my projects in as many different ways as I can...and for the record...there is quite a lot of May Arts ribbons & trims in the projects above...I can't help but reach for this yummy ribbon when working on my projects.
I will have a link to the videos I've created for each project above at the end of the post, this way you can see them up close and have a little more detail as to how I created each one if you're interested.
Please keep your fingers & toes crossed for me...I made it to the Second Round last year for the Video DT spot so this year I'm hoping to get that far again and actually make the team...that would be the ULTIMATE and is on my crafty Bucket List for sure.
Thanks again for stopping by my blog and for looking through my May Arts 2014-15 DT Call submission projects.
Happy Crafting!!
Links to videos:
Altered Clock & Mini: http://youtu.be/2ITz_3r8atg
Vintage Book Album:http://youtu.be/DdPzfRREXsg
Altered Tin Cans:http://youtu.be/qQL6u0ramVA
Mixed Media Card:http://youtu.be/Qo-cyNx03GI
Bucket of Spring Flowers:http://youtu.be/A9GvTIh2TLA
Hi Friends! Today I have a fun altered project to share with you today using some of the new Flower Ribbon ribbon available now in the 3GJ Store.
And as always I have a video that shows you the project up close along with the crafty goodies I used....
I used these FAB 3GJ goodies on the memo board..
Spooky Bundle (Witches Brew)
Celebrations Bundle (Sterling)
I loved pulling from the three bundles above to create this memo board....
Such a fun, quick and easy project to create for your craft room AND it's a great way to upcycle old frames as I did. I picked this one up on one of my junkin trips...painted it white, added some cork and the icing on the cake is the yummy ribbon from 3GJ!! I hope I was able to inspire you to dig into your 3GJ stash and use your ribbons and trims on some projects for your craft room or your home. If you haven't picked up some of the new Flower Bundle ribbon yet...head to the STORE and get some for yourself. Be sure to use Discount Code: AH10 to get 10% off your total order. Thanks for stopping by and Happy Crafting!!!
Hi Friends! Today I'm back with another fun DT project to share with all of you. This time I created a cool teenage-themed mixed media tag using some of the canvas flower pieces from the BLOOM collection.
I also have a video that shows you the tag up close along with a short tutorial on how I altered the bloom canvas pieces & used them as the skirt for my Prima Doll Stamp....
I really wanted to create something different with the bloom pieces and use them in a different application other than a flower. I knew I wanted to have some sort of texture/image on the canvas so I used some Archival Jet Black ink and used one of my background stamps...
Next I used some spray that I watered down a bit with some water on the canvas pieces (please note that I didn't cut the flowers in half until after they were sprayed)....
I used my TH Tiny Attacher to create pleats on each end of the flower piece I was using. This created a draped and skirt like effect with the pieces. I just made the pleats go in a little further with each layer to create that ruffled skirt look...
Once that final step was complete, I just began layering all the elements on my tag. Super easy :)
I just love how the skirt came out using the Bloom canvas pieces. Such a fun project that really is quick to create. Be sure to head over to the Linnie Blooms store and pick up some fun canvas pieces to use on your mixed media & other crafty projects.
Happy Crafting!!!
Products used: Linnie Blooms-Bloom Canvas pieces~flower Prima Doll Stamp Kraft Tag DCWV-Lavender Stack Prima Ledger Paper pad Archival Ink-Jet Black Lindy's SG-Sea Mint Green spray TH DI-Walnut Stain & Frayed Burlap Cloud 9 Designs-clear stamp set Flat back pearls Jute Twine Misc flowers leaves/from my stash
Hi Friends! Today I'm sharing a DT project for Scor-Pal which is for the current Challenge No.5 "More Than One Score" Bright and Sunny.
I made a paper cone using the Scor-Pal and added some Bright and Sunny elements. I also have a video that shows you the project up close along with a tutorial on how to make the base of the paper cone....
This is such a fun and easy project to create that can be used for so many different occasions. Be sure to check out the Scor-Pal blog for all the details surrounding the challenge and how you can link up your project. You will have until 10:00 pm on June 30th to enter your project so you have lots of time to create your project. I know all of us on the Scor-Pal DT would LOVE to see what you come up with. Thanks for stopping by the blog today and Happy Crafting!!! Products used: Scor-pal Scor-Tape Cocoa Daisy April 2014 Kit~Hint of Sunshine Ranger Archival Jet Black ink Jute twine 3 Girl JAM Crinkle Ribbon~Coral Crush, Summer Sprinkles, Daffodil