Thursday Craft'n Chat-Resist Embossing Technique
Hey Everyone...welcome to another Thursday Craft'n Chat with Made Especially For You. I'm Abby from ScrappinAbby and I am really excited to share some scrappy tips/techiniques with you. Today I will be showing you how to create a really quick and easy card by using the resist embossing technique.
I will put a complete list of the supplies I used at the end of this post but first let me show you what I started out with...
I chose some paper & the stamped images I wanted to use on my card. Then I pulled out my Perfect Medium, clear emossing powder, my heat tool and the inks I wanted to use on this project.
Before I started stamping my images, I cut my paper for the card. It's much easier if you have your papers trimmed and ready to go before you start embossing.
In this photo you can see that I have my paper all ready to go. I chose to use a butterfly on this piece..you can see it on my clear stamping block. I applied some Perfect Medium to the image...make sure you apply a good amount as this will help the emobssing powder adhere to the image which results in a nice clear stamped image. Now you don't have to use Perfect Medium, you can use any form of embossing stamp pad. I just happen to like this particular brand best : ) You can also use an embossing pen if you have smaller stamps you want to use or if you want to add more detail to your stamped image.

Here's a better picture of how I "inked" up my stamp with the Perfect Medium. You can pat your stamp pad on top of your stamp or you can flip it around like it is in this picture...just depends on which method you are more comfortable with. Once you've juiced up your stamp...go ahead and press it onto your paper..be sure to press firmly but don't move it around or else your image won't come out crisp and clean...


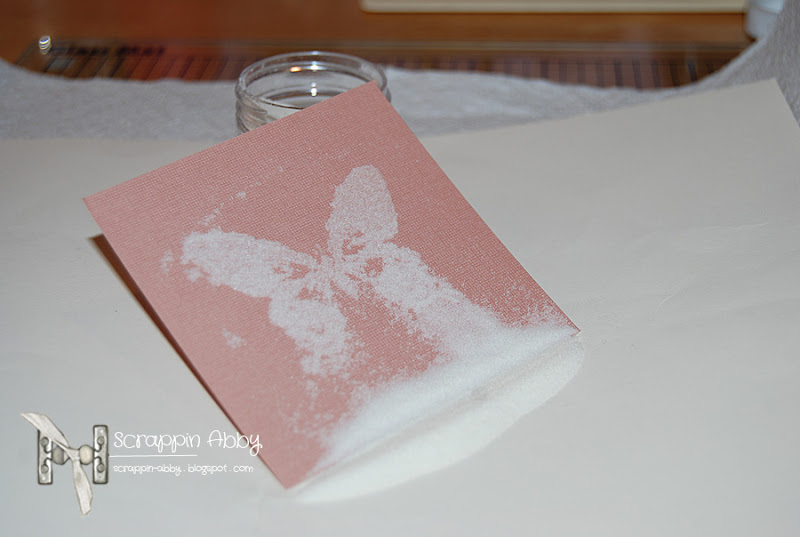
After you stamp your image you will want to go ahead and sprinkle your clear embossing powder over your image. A few pictures above you can see that I had my embossing powder out and open so it was ready for this next step. I also wanted to note that you will need to make sure you are using CLEAR embossing powder when doing this technique. I will show you why in just a moment. After you dust off the excess embossing powder you will use your heat tool over the image to emboss it. I wasn't able to take a picture of this process while I was doing it since I was alone...sorry about that.
This is what you will see after using your heat tool. Next you will ink your image.
I start off by inking up my blending tool and then going over the entire piece of CS and over the embossed image. Now you can ink this as dark or as light as you want..I chose to make my edges darker so the image "popped" a bit more.
This is what you will see after you ink your embossed image. Now you can see why you want to use clear embossing powder..this is what makes the "resist" embossing. The ink won't adhere to the stamped image, only on the paper around it...pretty cool huh : )
The next couple of photos are of the same process I went over above but are for the stamped sentiment on my card. I wanted to show you how this same process looks on lighter paper and with a different color of ink....
And here's the completed project....
Here's better view of the resist embossing...
See how cool that looks? I really enjoy using this technique on my projects. You can use this on not only cards but layouts, tags, gift bags and all sorts of other scrappy projects. The possibilites are endless with this technique.
If you haven't tried resist embossing before I want to encourage you to do so. It's super easy to do and you get such a beautiful & unique look on your projects when you are done.
Thank's for letting me share this technique & project with you..I had a lot of fun working on this card.
Happy Scrappin!
Abby
http://scrappin-abby.blogspot.com/
Products used:
DCWV-Coral Couture Stack
Ranger Perfect Medium
Tim Holtz Distress Ink-Frayed Burlap
Close To My Heart Clear Embossing Powder
Heat tool
The Twinery-Caribbean twine
The Girls Paperie Market Trims-Jubilee
My Minds Eye clear stamps


Beautiful card-awesome tutorial! TFS!
ReplyDeleteSherrie K
http://sherriescraps.blogspot.com
Great jOb Abby!!! I ALWAYS forget about this technique!!! I may just have to do that this weekend :D
ReplyDeleteCrafty Hugs,
Jessica
www.craftinandstampin.blogspot.com
Thank you I havre looked at your techniques and may return I am going to have a go at this . The card you made is very pretty I like it well done . I have peeked at you other creations here, I like this blog and I like the way you craft and so I am following .Hugs Elaine
ReplyDelete