Hey Everyone...welcome to another Thursday Craft'n Chat with Made Especially For You. I'm Abby from ScrappinAbby and I am really excited to share some scrappy tips/techiniques with you. Today I will be showing you how to create a really quick and easy card by using the resist embossing technique.
I will put a complete list of the supplies I used at the end of this post but first let me show you what I started out with...
I chose some paper & the stamped images I wanted to use on my card. Then I pulled out my Perfect Medium, clear emossing powder, my heat tool and the inks I wanted to use on this project.
Before I started stamping my images, I cut my paper for the card. It's much easier if you have your papers trimmed and ready to go before you start embossing.
In this photo you can see that I have my paper all ready to go. I chose to use a butterfly on this piece..you can see it on my clear stamping block. I applied some Perfect Medium to the image...make sure you apply a good amount as this will help the emobssing powder adhere to the image which results in a nice clear stamped image. Now you don't have to use Perfect Medium, you can use any form of embossing stamp pad. I just happen to like this particular brand best : ) You can also use an embossing pen if you have smaller stamps you want to use or if you want to add more detail to your stamped image.

Here's a better picture of how I "inked" up my stamp with the Perfect Medium. You can pat your stamp pad on top of your stamp or you can flip it around like it is in this picture...just depends on which method you are more comfortable with. Once you've juiced up your stamp...go ahead and press it onto your paper..be sure to press firmly but don't move it around or else your image won't come out crisp and clean...


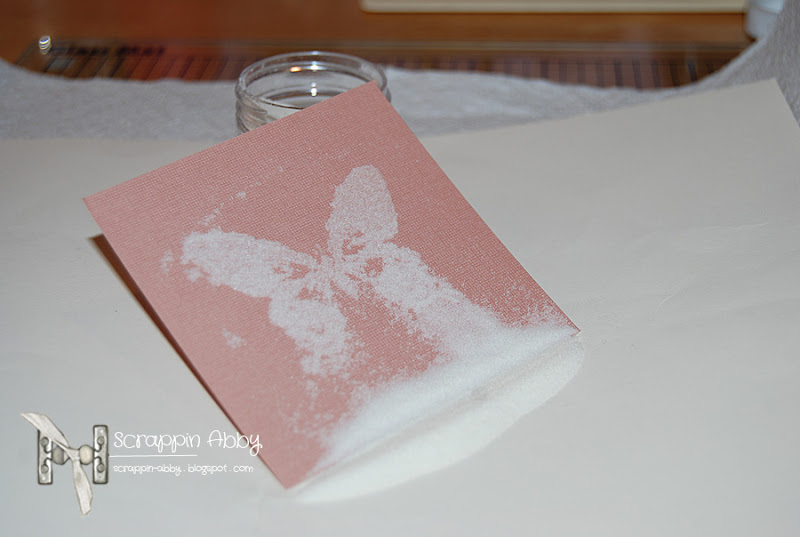
After you stamp your image you will want to go ahead and sprinkle your clear embossing powder over your image. A few pictures above you can see that I had my embossing powder out and open so it was ready for this next step. I also wanted to note that you will need to make sure you are using CLEAR embossing powder when doing this technique. I will show you why in just a moment. After you dust off the excess embossing powder you will use your heat tool over the image to emboss it. I wasn't able to take a picture of this process while I was doing it since I was alone...sorry about that.
This is what you will see after using your heat tool. Next you will ink your image.
I start off by inking up my blending tool and then going over the entire piece of CS and over the embossed image. Now you can ink this as dark or as light as you want..I chose to make my edges darker so the image "popped" a bit more.
This is what you will see after you ink your embossed image. Now you can see why you want to use clear embossing powder..this is what makes the "resist" embossing. The ink won't adhere to the stamped image, only on the paper around it...pretty cool huh : )
The next couple of photos are of the same process I went over above but are for the stamped sentiment on my card. I wanted to show you how this same process looks on lighter paper and with a different color of ink....
And here's the completed project....
Here's better view of the resist embossing...
See how cool that looks? I really enjoy using this technique on my projects. You can use this on not only cards but layouts, tags, gift bags and all sorts of other scrappy projects. The possibilites are endless with this technique.
If you haven't tried resist embossing before I want to encourage you to do so. It's super easy to do and you get such a beautiful & unique look on your projects when you are done.
Thank's for letting me share this technique & project with you..I had a lot of fun working on this card.
Happy Scrappin!
Abby
http://scrappin-abby.blogspot.com/
Products used:
DCWV-Coral Couture Stack
Ranger Perfect Medium
Tim Holtz Distress Ink-Frayed Burlap
Close To My Heart Clear Embossing Powder
Heat tool
The Twinery-Caribbean twine
The Girls Paperie Market Trims-Jubilee
My Minds Eye clear stamps
Hey everyone...welcome back for another FAB challenge with The Perfect Sentiment
This weeks challenge is to create a card with a sentiment of congratulations or any sentiment that acknowledges an accomplishment or encourages someone to pursue their dreams/goals. Examples include: Congrats, You Did It, Dream Big, So Proud of You, You Rock, Shoot for the Stars, etc. Remember your sentiment must be on the front of the card.
The twist....Use the attached sketch as inspiration for your card design. Feel free to rotate or flip the sketch to make it work for you as long as we can still see the basic outline of the sketch in your design.
I will show you the sketch in just a moment...first here's my take on this weeks challenge....
Now here's the sketch that you will use for this challenge...
You can flip the sketch & make it your own...just be sure we can still see the basic theme in your creation. Now for more of my Celebrate You card : )
I stamped my Celebrate sentiment on some Frappaccino CS using distress ink in Iced Spice. I had this fab vintage trim I picked up junkin...inked it with some Antique Linen distress ink to give it that aged look and I topped it off with a staple after using more of the Iced Spruce around the edges.
Now this part was really fun to do. I love to fussy cut~yes that might sound insane to some of you but I find this very relaxing & I may or may not cut with my tongue poked out...hey it helps me cut straight ; ) anyway I fussy cut the peonie that matches the one directly underneath...inked the edges with more Iced Spruce & used a dimensional adhesive dot to make the petals & the leaves "pop" off the card. I snipped some foam floral centers from a flower I had for the center. I really like how this turned out...it just adds so much more to card I think.
Here's a closer look...
I've had these wooden letter tiles for some time now...I can't recall where I picked them up...I luckily had these letters in the jar. To be honest..these were my starting point for the design in this card. I wanted to use something different than just another stamped sentiment or stickers etc...these were perfect! Normally I distress the heck out of most everything I put on a card but this time I just let the embellishment speak for itself. I ran a strip of some fuzzy green trim on the bottom to finish it off.
A little peek at the inside : )
I receive a lot of very kind comments from my followers/visitors regarding the insides of my cards. I truly appreciate your kind words. I LOVE making the inside look just as pretty as the outside...I mean..it just completes the look. I can't stand how boring and plain store bought cards look on the inside...I mean they are just white with a small sentiment inside...blech!! ; )
So are you ready to see some awesome inspiration from my fellow DT members? Just to let you know...I've already seen their cards and you will not be disappointed let me tell you...I am surrounded by some very creative & talented ladies : )
Jenn
Sami
Jan
Karen
Maggie
Sassy
Tabitha
Theresa
And don't forget to visit our guest DT for the month of March...
Cheryl
Our amazing sponsor for this weeks challenge is Pattie with Pattie's Creations
Pattie is offering up one free digi for this weeks winner. She has been a faithful sponsor of The Perfect Sentiment so be sure to stop by her Etsy store and give her some support!!
Now that you have been inspired by the Perfect Sentiment DT...head into your creative space and get started on your card for this weeks challenge. We love seeing our faithful friends who enter our challenges each week and we would love to see some new creative friends join us as well. So tell all of your creative friends about our challenge for this week and start submitting those cards : )
Be sure to come back tomorrow for another scrappy post...I will be doing a written tutorial with some photos on how to do the resist embossing technique...you won't want to miss it : )
Happy Scrappin!!
Products used:
Coredinations CS-Frappaccino
My Minds Eye Life Stories CS-White Peonies & Green Plaid
Wood tiles-scrappy stash
Celebrate sentiment-scrappy stash
Green Trim-scrappy stash
Tim Holtz Ideaology staple
Tim Holtz Distress Ink-Iced Spruce & Antique Linen
Vintage trim-scrappy stash
Happy Tuesday my creative friends!! I am excited to share with you my new space at the new location of my good friend Mindy's new shop...Not Too Shabby. I did a post about the first location HERE and HERE. Well Mindy found a FAB new space for her store & all the vendors and the grand re-opening was two weeks ago. I will be doing a post about Mindy & the store along with photos of the different shabby vendors in the next week or so. Today's post is about my little ScrappinAbby nook....
Some scrapped up vintage books & an altered clipboard...
A vintage wooden frame I picked up while junkin that I painted/sanded/distressed. I then cut a piece of DCWV's Chalkboard paper stack to fit in the frame..added some chalk & lace...voila!!
Here are some more chalkboard frames..paper flowers (that I hand cut I might add), altered canvas..mini books..cards & more!
More cards & some tea-stained paper & fabric tags I made by hand. I also have some clothespins that I embossed...they turned out great!
Some LO's in different themes...
Die cut flowers...greeting card sets...more tags & rosettes....
More LO's & a really cool shabby welcome banner I made.
I am constantly working on new projects & designs for my space so my inventory changes weekly. If you are in the Albany Oregon area...stop by Not Too Shabby on 1st Street in downtown Albany. There are a lot of FAB shabby ladies who have spaces in there...you won't be disappointed.
Thanks for letting me share my new business venture with all of you. I have been doing pretty well so far (knock on wood) and I hope it just continues to grow and grow. I love playing with paper & when I am able to sell some of my scrappy creations...I love being able to share those items with others & earn some extra scrappin money as well : )
Be sure to stop by tomorrow for another scrappy post...we have another great weekly challenge in store for you at the Perfect Sentiment. And on Thursday I will be doing a spot on the Made Especially For You challenge blog for our Thursday's Tips & Tricks feature...mine will be on resist embossing...fun fun fun!!!
Happy Scrappin!
Welcome back friends...it's Monday so that means it's time for another weekly challenge with Made Especially For You
This weeks challenge is featuring the distress ink technique..this is something I use ALL the time so I was happy to see this challenge : )
Take a look at my card....
I really like how this card turned out. I used my new Sizzix Pear embossing folder along with some trim I picked up at the CK Convention...always fun to use new scrappy goodies : )
Here's a closer look at the deep embossing on this card. I used two different Distress Inks on this card...Tim Holtz's Frayed Burlap & Forest Moss. I also used the Forest Moss on the distressed edges of the cardstock & mini paper bag.
So a little story behind the mini paper bag. This is from our local hardware store...I found them when I was with my hubby a while back. I just cut it down to the size I wanted & glued the bottom so it would make a small pocket. This held the paper flowers nicely & I topped it off with my "Hi" sentiment. Pretty cute huh?
Here's some of that yummy trim by Mon Ami Gabby.
I used more of the Distress Ink on the inside card as well. Wrapped some more of the green sheer ribbon & added another paper flower...Volia!!
Our sponsor for this weeks challenge is Whoopsi Daisy
Cute name huh? The winner will receive two sheets of stamps..what a great prize!! Be sure to stop by their webpage and check out all the fab images they have available.
So now that you have been inspired by my card (hopefully) be sure to head on over to the Made Especially For You challenge blog to see the cards from very creative fellow DT members. You will also want to check out all of the rules & guidelines surrounding this challenge.
Be sure to come back tomorrow for another scrappy post. I will be sharing with all of you my little ScrappinAbby nook at my friends shop, Not Too Shabby.
Happy Scrappin!!
Products used:
Kraft CS
Bazzill-yellow
Sizzix Pear embossing folder
Tim Holtz Distress Ink-Forest Moss & Frayed Burlap
Green sheer ribbon-scrappy stash
Mon Ami Gabby-green trim
Mon Ami Gabby-paper flowers
Mini paper sack-local hardware store
Stampology Clear Stamps-Hi sentiment
Welcome back friends...it's Wednesday so that means it's time for another FAB challenge from The Perfect Sentiment
I have to tell you that this challenge out of all the challenges since I've been on the PSDT is my favorite. I use some form of distress on almost every single scrappy project I design & create. I love this weeks challenge : )
Here is my distressed thank you....
I used a few different distress techniques on this card. The obvious one is the tearing I did in the center. I stamped my "Merci" sentiment on some coordinating CS and then placed another piece of CS over the top after distressing the edges with my Making Memories Distressing tool. I did a crisscross cut in the center (before adhering it to the card) peeled back the edges..distressed them with ink and my tool. Once it was adhered to the card I rolled the edges back a little more with a pencil...voila!!
Love this trim!!!
I did another distress technique on this fabric flower. I simply ran some Tim Holtz Distress Ink in Walnut Stain over the top and accented it with some Pink Pastel chalk ink.
Love the layers....
Ready for some inspiration from my amazing DT members??? Well click on their names below to see their creation for this weeks challenge...
Jenn
Sami
Jan
Karen
Maggie
Sam
Sassy
Tabitha
Theresa
And we also have a guest DT for the month of March...
Cheryl
Our sponsor for this week is Stitchy Bear Digital Stamps
Isn't their button cute??? Stitchy Bear is offering up a $10 gift voucher to their store...so if you are the lucky winner for this weeks challenge you can choose whatever images you want with the $10 prize..cool huh?
Now that you have been inspired by the PSDT cards & heard about the amazing prize up for grabs...head into your creative space and start working on your card for this weeks challenge. Be sure to check out all of the information surrounding the challenge HERE at the Perfect Sentiments Challenge Blog.
Be sure to come back for another scrappy post!!
Happy Scrappin : )
Products used:
My Minds Eye-Pink Damask & Antique Flower CS
Kraft CS
Tim Holtz Distress Ink-Walnut Stain
Colorbox Fluid Chalk-Pink Pastel
Tim Holtz Idea-ology staple
Stamped Sentiment-from scrappy stash
Flower & pink trim-scrappy stash
Welcome back my creative friends...today I am announcing my first ever blog hop blog candy winner..YAY!! Since I didn't use a digi image for my card I had in my blog hop post I will be sending my winner some FAB scrappy items from my personal stash...trust me you will like what you get..I almost hate to give it up..lol.
Drum roll please.....and the winner from the Random.org generator is....
Sherrie K....